

DCA Trading Bot Part Two
Previously, we created two DCA bots, one in Python and one in Julia. You can find a link to that here. Our first iterations of these bots…

Previously, we created two DCA bots, one in Python and one in Julia. You can find a link to that here. Our first iterations of these bots have several issues we need to address. First, these bots crash if they don’t have enough balance. Second, if someone runs up the orderbook price, the bots are still set to buy 1 YEC at whatever that price might be, no matter how expensive. In this post, we are going to make our bots a bit smarter and we’re going to make them tell us about a low balance. In the python bot we’re only going to make it print on the local console. You can go ahead and skip to Part One if you would like.
If you are building the Julia bot, you have a built in shell and we’re going to take advantage of it. We are going to install yecshell and use it to send low balance alerts to Ywallet. Hanh recently added a message tab to Ywallet and I figure this is a great way to make use of it. The current version yecshell is in need of some updates, but branch “177” has almost all of the required changes. Aside from the changes in “177”, it also needs a server change. I pointed it at a different server and merged those changes here https://github.com/nultinator/yecshell.
We could set up email or text alerts, but that just doesn’t sound very crypto to me. 1 YEC is divisible into individual 100,000,000 units we often refer to as yoshis. We can send just one yoshi, and shielded transactions on our blockchain can be sent with a memo. So the cost (at the time of this writing) of this message will be approximately $0.26 divided by 100,000,000 plus the transaction fee (0.00001 YEC).

If you do not have rust and cargo installed, you will need to install them. You can find instructions for that here https://www.rust-lang.org/tools/install.


There are many external dependencies so it takes a few moments for cargo to build it. Next we’ll “cd” back to our home spot and copy our newly built binary to our “bot” directory.


Next (optional), to save space, I’m going to remove the yecshell directory we cloned into, I don’t need it for anything.

It‘s pretty barebones so we’ll go through setup right now.
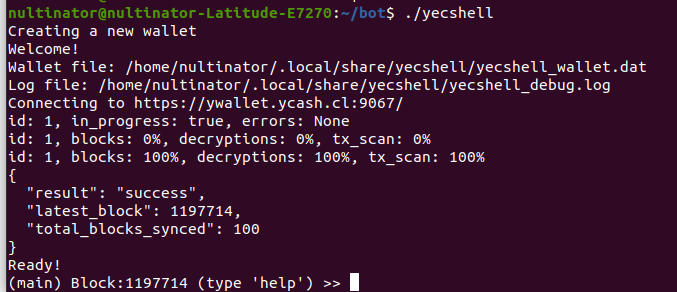
This starts yecshell in interactive mode, you can back up your wallet using either your seed or your private key.


Once you’ve saved your seed and/or private keys, your wallet is backed up and ready for use. Send some minimal amount of YEC to the wallet you just created. You can view your new receiving addresses with the “addresses” command.

Part One: The Python Bot
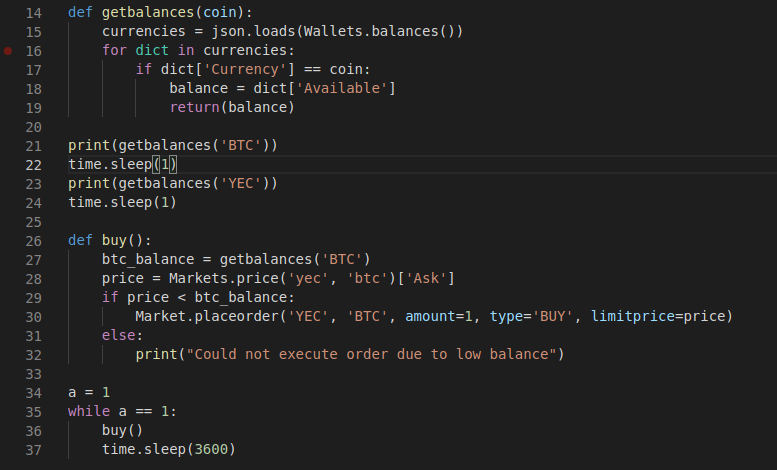
Let’s open up “bot.py” in our text editor and change a few things. We’re going to tell the bot to find our BTC balance. Then we’ll tell it only to buy if our balance is greater than the price of 1 YEC. In order to do this, we’ll change our “getbalances()” function return the price of whichever coin we query. We then change our buy function to check our BTC balance before buying. The “if” statement tells it to only buy 1 YEC if it can afford one whole coin.
Try it with a low balance and…

This is exactly what we wanted. Personally, I don’t think this goes far enough. As I said earlier, the bot is vulnerable to price spikes. Let’s add some code to calculate the average seven day high and the average seven day low. For this we’re going to import another module, “datetime”. We’ll then need to add some code for Unix time in milliseconds. Fair warning, IT IS UGLY.


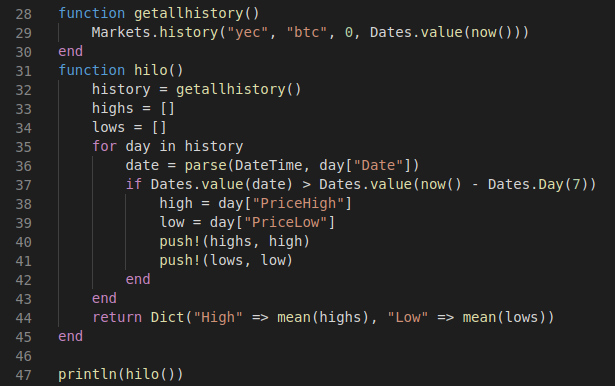
Now we have to add a function to return our average highs and lows.

To test it, add a simple “print(hilo())” after the function is defined.

This function should return an output that looks like this…

In our output, we get our average high on the left and our average low on the right. Finally, we’ll have to make it do something based on that output. If the price is 10% higher than our average high, the bot will notice the spike and refuse the buy. If the price is lower than the average low, and it can afford it, the bot will buy 2 YEC. Other situations will defer to our previous buying strategy.

Let’s try it out!

Success!
Part 2: The Julia Bot
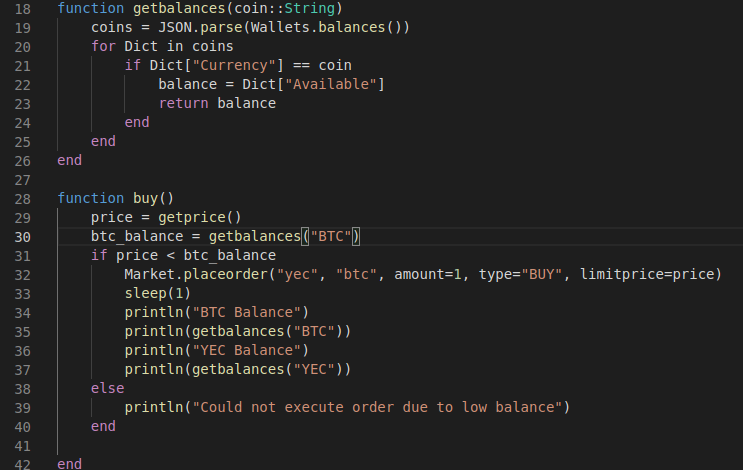
So here we’ll add some similar lines to “bot.jl”. Notice how we close our “for” and “if” statements just like functions with the “end” keyword. Notice how I annotated the data type of coin in our “getbalances()” function. This is not required, our compiler usually can guess types at compile time. However, I was getting an error about 50% of the time when testing it, so I added the “String” type so the compiler won’t have to guess.
and…
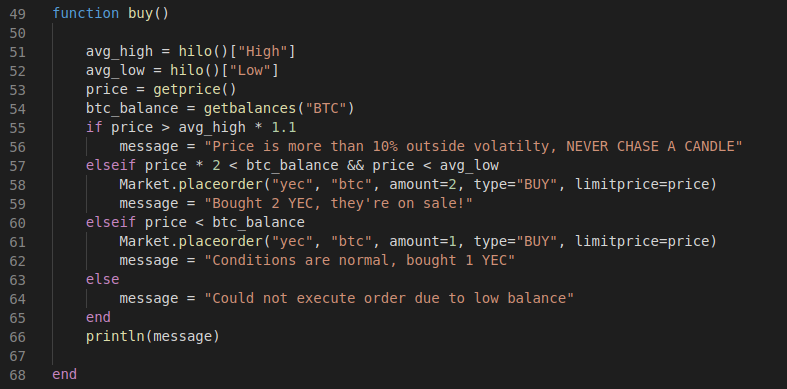
We get the proper message. Now to add the buying strategy we added to “bot.py”… With PyCall, I get an error when passing two computed values into “Markets.history()”, to get around this, I need to take the full history and filter through the dates on my local machine. To calculate our average, we’ll add the “Statistics” package as well.

Now we’ll add our “hilo()” function. I originally was going to use “Markets.history()” inside of “hilo()”, but I was running into escape errors (this error is also due to PyCall) at compile time so I defined it separately.
Filtering the dates locally (as you can see) is not too tough of a job, Julia is really good for tasks like this which I think is why Data Scientists like it. Notice the difference in syntax with our dictionary. Next we’ll add the new buying code.
Alright, here’s the fun part. First we’re going to tell Julia how to interact with yecshell. When using the “run()” function in Julia, backticks tell the REPL that this is a shell command. To run yecshell in non-interactive mode, we simply pass our commands as arguments.

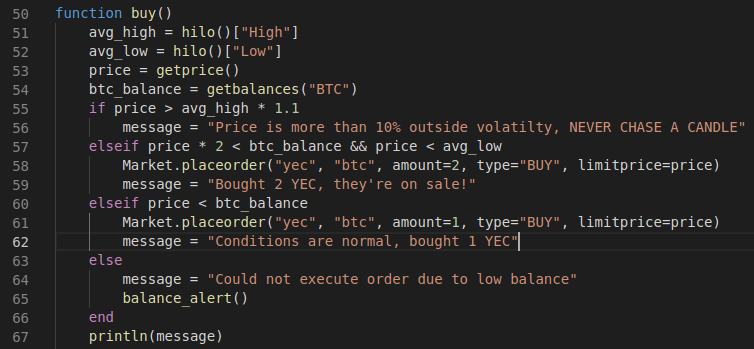
Our final “buy()” function looks like this.
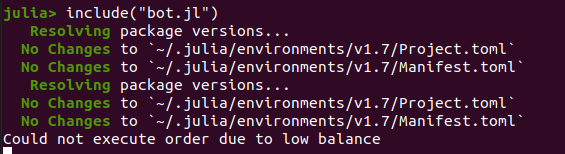
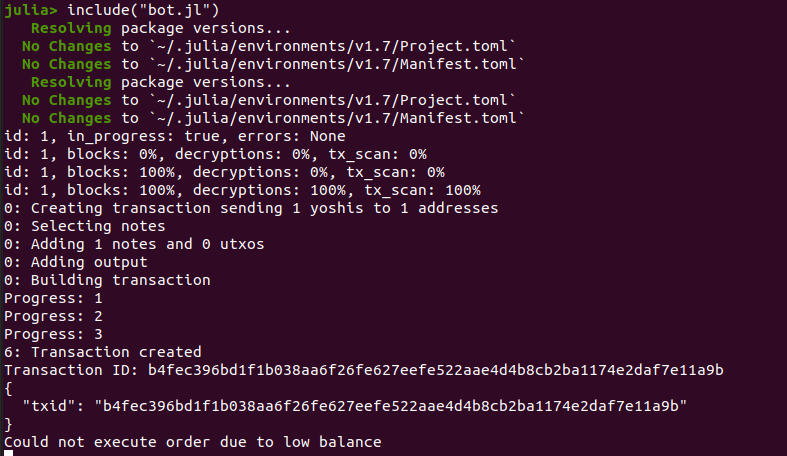
Run the bot with a low balance and…
Open up Ywallet, tap the “Messages” tab and…
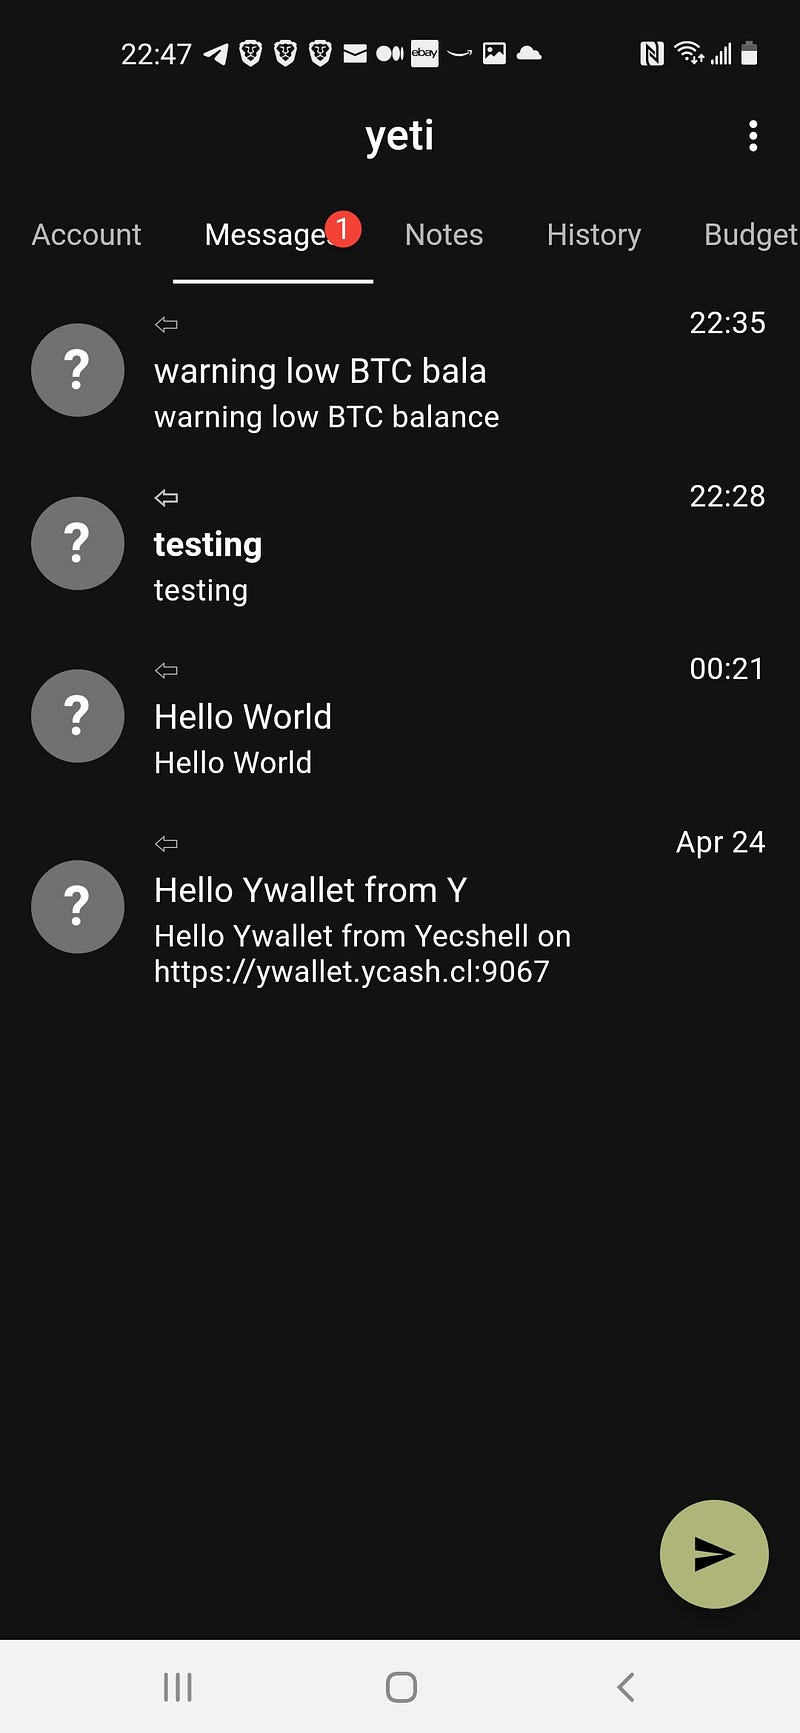
I have a message notification. Let’s see what my message says.
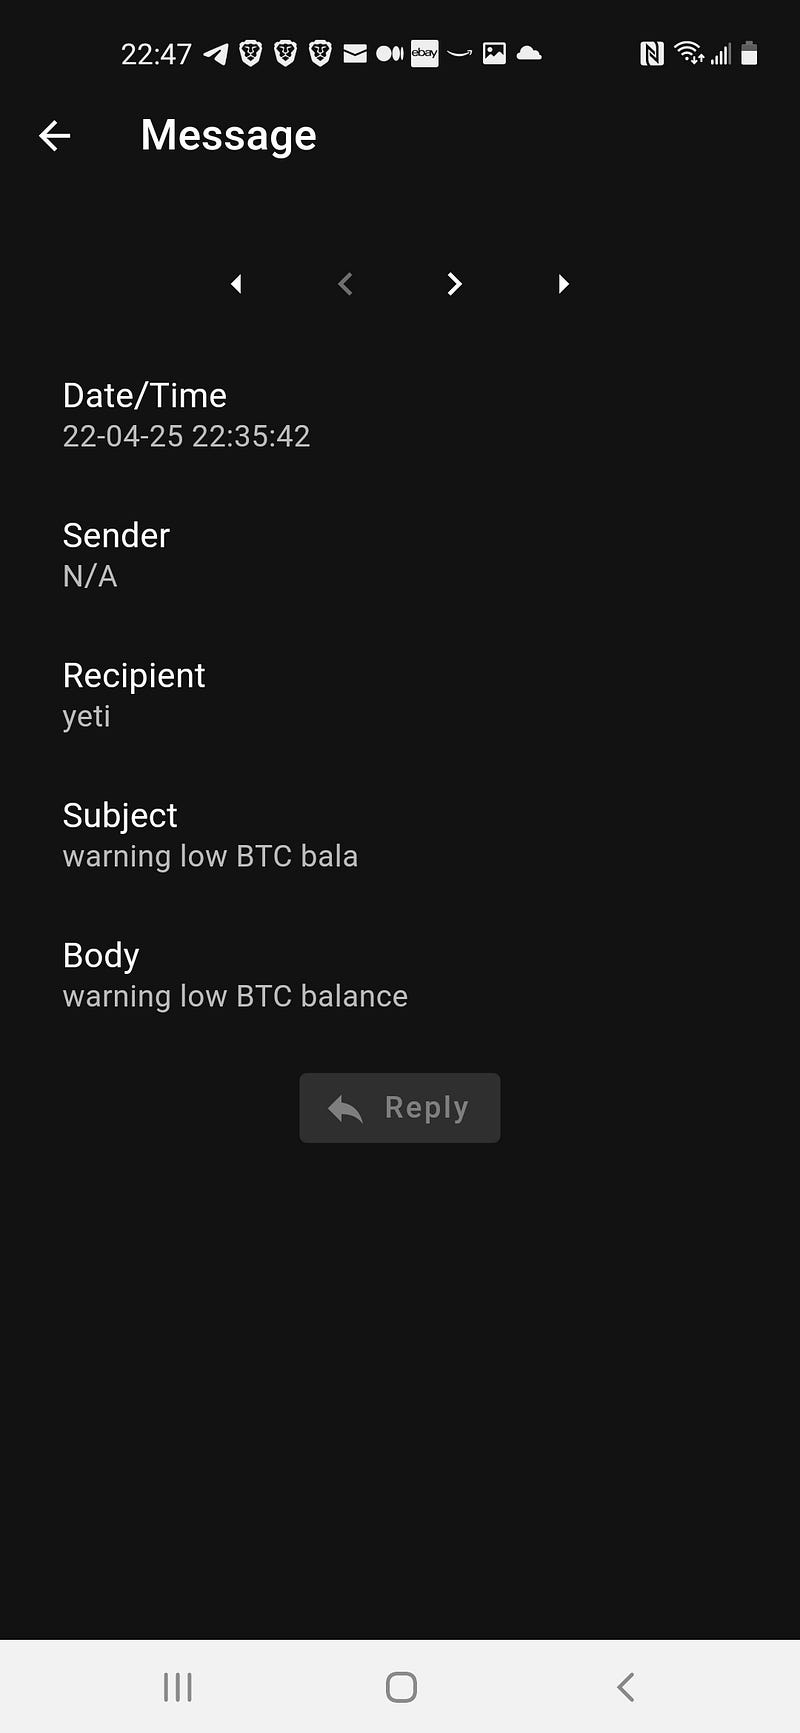
There you have it. Low balance alerts right to Ywallet.
You can find the full source code for our bots here.